Push Pin Mascot: A Designer’s Stitch-Out Review
When evaluating a new machine embroidery design for commercial or personal use, I look beyond the digital preview. As an experienced designer and product reviewer, my primary concern is how the artwork translates from screen to fabric. The Push Pin Mascot immediately caught my eye as a versatile asset, particularly for those of us navigating the bustling Back To School season or creating whimsical office and study decor. However, a cute concept only succeeds if the stitch-out is clean, durable, and visually balanced. After analyzing this design for real-world application, here is my professional assessment of its performance, best uses, and technical considerations for makers and shop owners.
First Impressions and Visual Personality
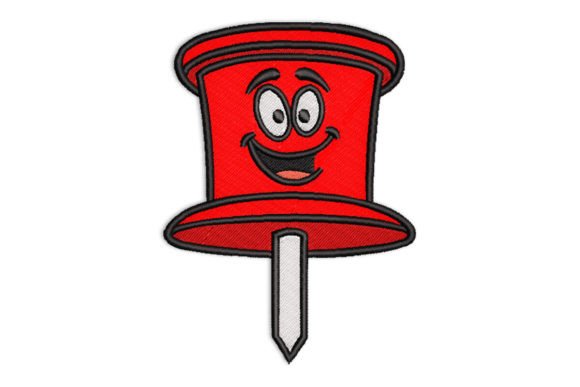
The Push Pin Mascot carries a distinct retro-academic charm that feels both nostalgic and fresh. Visually, it strikes a balance between playful character art and functional iconography. For an Etsy seller or boutique owner, this duality is valuable. It isn't just a cartoon; it is a thematic anchor that communicates organization, creativity, and learning without being overly juvenile. The shape is generally compact, which suggests good potential for various hoop sizes, but the personality relies heavily on facial expression and outline clarity. In my review, the design feels most at home on items that bridge utility and aesthetics, such as personalized stationery holders, teacher appreciation gifts, or custom apparel for students and educators.
Real-World Application: The Custom Tote Bag Test
To truly judge this embroidery file, I mentally placed it in a specific production scenario: stitching a custom canvas tote bag for a university bookstore or a handmade market stall. Tote bags are high-traffic items that require durability. The Push Pin Mascot works exceptionally well here because its bold silhouette reads clearly from a distance. When embroidering on canvas, the texture can sometimes swallow fine details, but this mascot’s structure appears robust enough to hold its own against the fabric texture.
For this project, I would position the mascot slightly off-center or near the bottom corner to allow space for monogramming or school names above it. This layout maximizes the finished product's perceived value. Customers looking for a personalized gift often want the customization to integrate seamlessly with the main graphic. Because the Push Pin Mascot has a defined shape, it acts as a perfect visual counterweight to text, ensuring the tote bag design doesn't look top-heavy or cluttered. If you are running a craft business, this design pairs beautifully with collegiate fonts or simple serif typefaces to create a cohesive collection.
Technical Performance and Fabric Considerations
While the aesthetic is strong, technical execution determines whether a design becomes a staple in your library or a one-time use. When working with the Push Pin Mascot, pay close attention to your substrate choice. This design likely utilizes a mix of satin stitch outlines and fill stitch areas to create dimension. On stable fabrics like denim, twill, or medium-weight cotton, these stitches should lay flat and crisp. However, caution is required for stretchy knits or lightweight t-shirts.
If you plan to use this for sweatshirt embroidery or baby clothes, proper stabilization is non-negotiable. The density required to render the mascot’s features could cause puckering on thin or elastic materials if not supported by adequate stabilizer. I recommend testing on a scrap piece of your exact garment material first. For dark fabrics, ensure the design includes sufficient underlay or light-colored outlining so the character’s expression doesn't get lost in the background shadows. Conversely, on white or cream towels, verify that the thread colors provide enough contrast to define the edges. A handmade product loses its professional appeal if the stitching blends too much into the base fabric, making the mascot look muddy rather than charming.
Strategic Placement and Product Suitability
Not every embroidery project suits every design. Based on the Push Pin Mascot’s proportions and theme, here is where it shines and where to proceed with care:
- Ideal Applications: Kitchen tea towels, apron pockets, pencil cases, laptop sleeves, nursery pillows, and teacher lounge decor. These items offer stable surfaces and align perfectly with the "whimsy and charm" description.
- Proceed with Caution: Curved surfaces like baseball caps or structured beanies. Unless the design is specifically digitized for caps, the mascot’s vertical orientation might distort on a curved brim. Always check the aspect ratio before committing to headwear.
- Avoid: Extremely small placements like shirt cuffs or sock ankles. Detailed mascots lose their readability when scaled down below 2 inches. If you need a tiny accent, look for a simplified icon version instead.
For commercial embroidery businesses fulfilling bulk orders, this design is a safe bet for mid-sized placements on polos or tote bags. Its universal appeal reduces the risk of customer rejection compared to niche trends. However, always confirm licensing terms before selling finished goods or using the image in printable mockups for digital listings.
Enhancing Value Through Professional Execution
The difference between a hobbyist stitch-out and a premium small shop product often lies in the finishing details. When using the Push Pin Mascot, consider how thread sheen affects the mood. A matte cotton thread gives a vintage, handmade feel suitable for heirloom-style baby embroidery or rustic home decor. A high-sheen rayon or polyester thread makes the colors pop, lending itself to modern custom apparel and vibrant school spirit gear. Matching your thread colors to current seasonal palettes can also boost sales; think mustard yellows and deep reds for autumn, or bright primaries for back-to-school promotions.
Furthermore, presentation matters. When photographing your work for an Etsy listing or social media, ensure the lighting highlights the stitch texture. Flat-lay photos show the design accurately, but lifestyle shots demonstrate scale and usability. Seeing the Push Pin Mascot actually pinned to a corkboard or stitched onto a child’s backpack helps buyers visualize the end result. This builds trust and validates the price point of your design assets or finished merchandise.
Essential Pre-Stitch Checklist for Makers
Before loading this digital embroidery file into your machine for a client order or inventory build, run through this practical checklist to avoid costly mistakes:
- Verify Hoop Compatibility: Confirm the design dimensions fit your available hoops with adequate clearance. Never force a design into a hoop that is too tight; this causes registration errors.
- Check Stitch Density: Inspect the file in your editing software. If the fill areas seem excessively dense for your chosen fabric, reduce the density slightly to prevent stiffness or needle breaks.
- Test Color Contrast: View the design in black and white mode on your screen. If the mascot disappears or looks flat without color, adjust the values or add outline stitches to ensure definition on any fabric shade.
- Validate Licensing: Re-read the product description regarding commercial use. Ensure you are compliant whether you are selling physical embroidered items or incorporating the mascot into broader design assets.
- Sample First: Always stitch a test run on the actual fabric and stabilizer combination intended for the final project. This is the only way to guarantee the Push Pin Mascot delivers the promised whimsy and charm in tactile form.
Ultimately, the Push Pin Mascot is a delightful addition to any embroiderer's repertoire, provided it is treated with technical respect. Its strength lies in its ability to evoke warmth and nostalgia while remaining adaptable across various products. By paying attention to fabric stability, thread selection, and appropriate sizing, you can transform this digital artwork into tangible, sellable goods that resonate with customers seeking that perfect touch of handmade personality. Whether you are decorating for a classroom, stocking a boutique, or crafting a heartfelt gift, this design offers a solid foundation for creative success.